
We help you find all the hidden dolls in the Resident Evil 3 demo. And if you have to take Nemesis ahead, we do it!
Since March 19, PC, PS4 and One users can take their first walk through the new reimagining of Raccoon City thanks to the Resident Evil 3 demo that Capcom has published in digital stores. This time, too, the company hasn't imposed a time or usage limitation like it did with RE2's 1-Shot last year, so we can come back again and again so as not to leave a single corner unexplored. In fact, that is just the intention of its creators, who have seasoned its brief development with a mission with more crumb than it seems at first glance.
True to the tradition of searching for and destroying big-headed dolls (first they were Resident Evil 7's Mr. Everywhere, then Resident Evil 2's Mr. Raccoon), the studio has conscientiously hidden 20 of Mr. Charlie's dolls, the mascot of the local toy store. Some are easy to locate due to their location or the faint sound they emit – especially if we play with headphones. Others, however, require lynx sight or directly use guide. As a demo, destroying them does not unlock the achievement of rigor, although those who complete the quest will be rewarded with points from the ambassador program. But surely the best prize for most is having an apology to squeeze this appetizer while we wait for the launch on April 3. So there we go.
Normal dolls (fixed)
Normal dolls are understood as those that are from the beginning of the demo in a certain position and the challenge is simply to locate them. Others require previous steps to appear and will be discussed in more detail in their own section. Note also that, in any of the cases, the destroyed dolls will already count as such in the following games (come on, it is not necessary to get twenty of the pull).
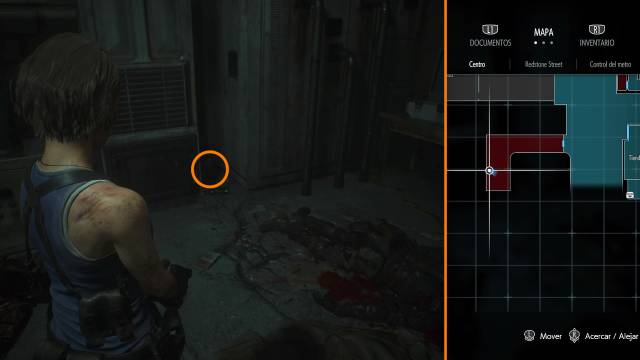
1. Redstone Street Station
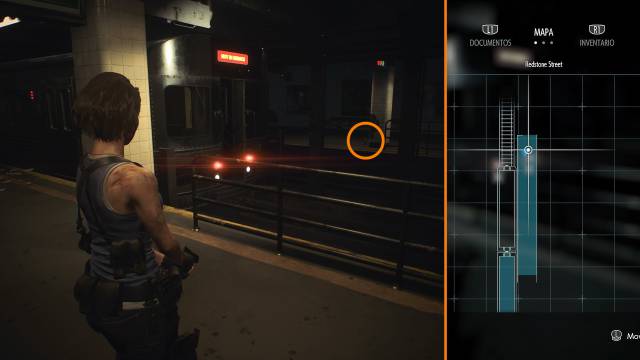
As soon as we take control of Jill, if we leave the subway heading north (opposite the exit towards the city) we can see him on the other side of the road.
2. Redstone Street Station (Entrance)
Going up towards the street, just before leaving the station we can see him on the table next to the first trunk of objects.
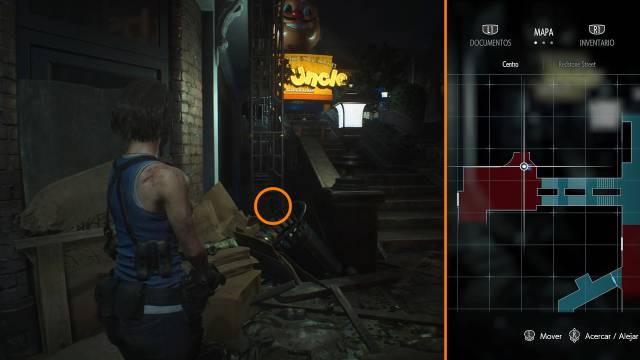
3. Streets (Ambulance)
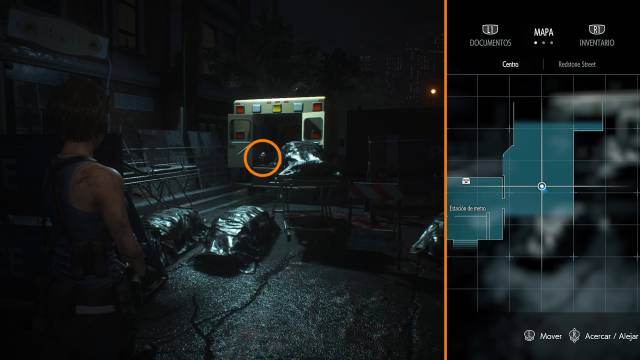
From the previous room, after crossing under the blind, it can be seen on the right hand side inside an ambulance.
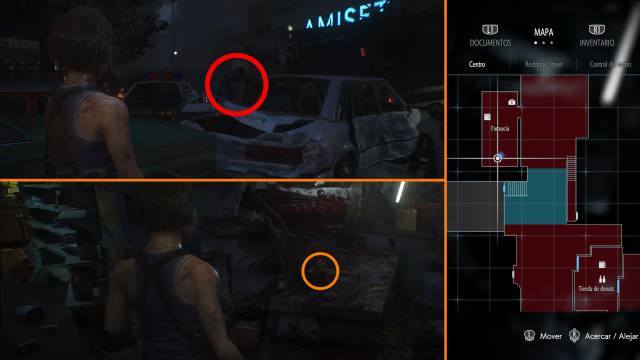
4. Streets (car hood)

After advancing through an alley towards the second part of the street, the only possible path leads us to a sequence where Jill talks to Carlos on the radio. Upon regaining control, we have the next doll right in front of us, on the hood of a police car on the other side of the fences.
5. Streets (Scaffolding)
After the following sequence, in which zombies throw other fences on one side of the street, the access to some stairs opens. As soon as they are lowered, we must look at the other side of the right handrail and we will see a doll under the scaffolding.
6. Roof
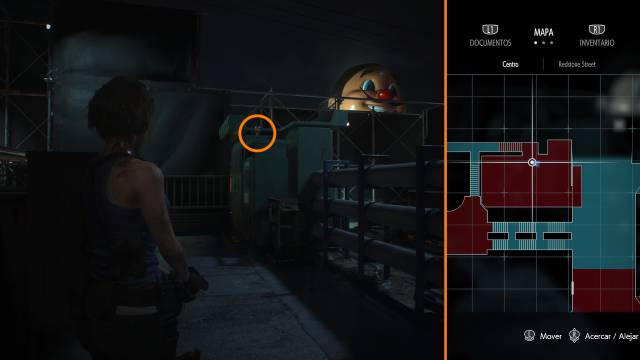
If we momentarily ignore the donut shop (Moon's Donuts) and continue to the right from the end of the previous staircase, we will go up some metal ones that lead to another fork. Taking a right turn again, we will come to a rooftop from which you can see the original Mr. Charlie from the store and the next doll on an electric transformer.
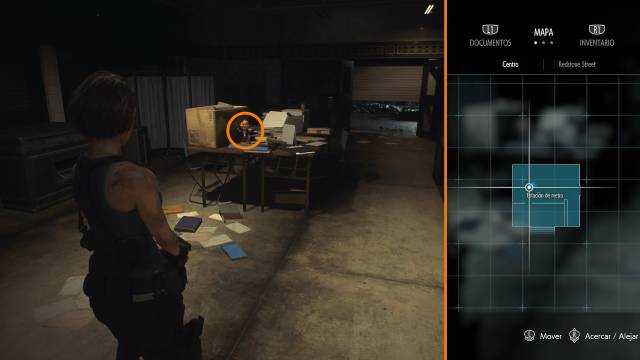
7. Warehouse
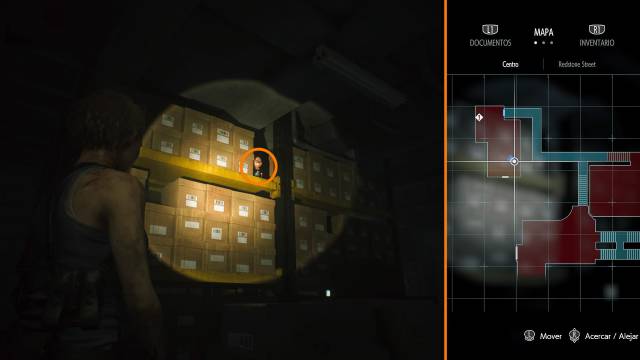
Going back to the fork of the metal stairs, the other direction leads to a warehouse with a safe (the solution is 9 left 1 right 8 left as we are). If we cross the corridor against the wall, we can see it on top of a shelf between the boxes.
8. Streets (About donut shop)
If we go outside the warehouse from the next door, we will be on the other side of the donut shop, but from a higher position. This allows us to locate and destroy the doll that is on its roof.
9. Streets (Rails)
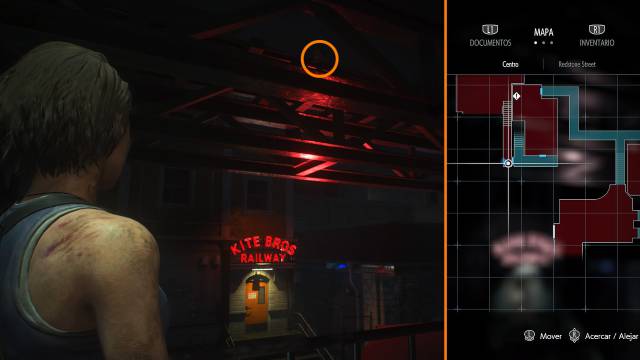
Without changing the position with respect to the previous doll, if we turn our eyes towards the entrance to the subway control (Kite Bros Railway), we can locate another one in the elevated structure that crosses just above the street.
10. Pharmacy
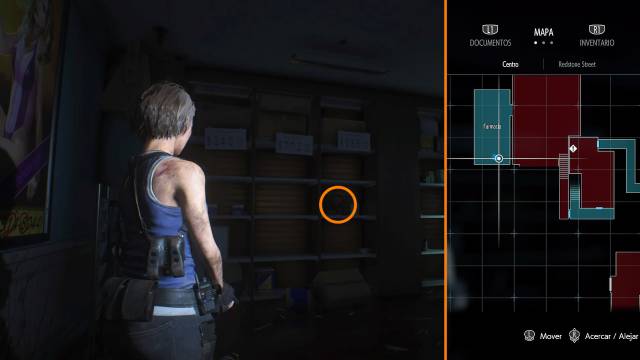
Going down to street level, to the right of the metro control we find a pharmacy. On a shelf attached to the poster that reveals the combination of the safe is another doll waiting.
11. Subway control
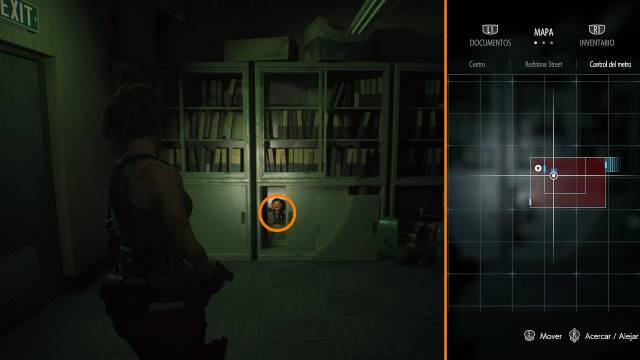
Already inside this building, in the same room where the shotgun is kept, we can see a doll inside a semi-open closet. It should be noted here that right in the next hallway is the hose, but picking it up activates the appearance of Nemesis in front of the donut shop. So do not do it until you have combed the area well.
12. Donut Shop
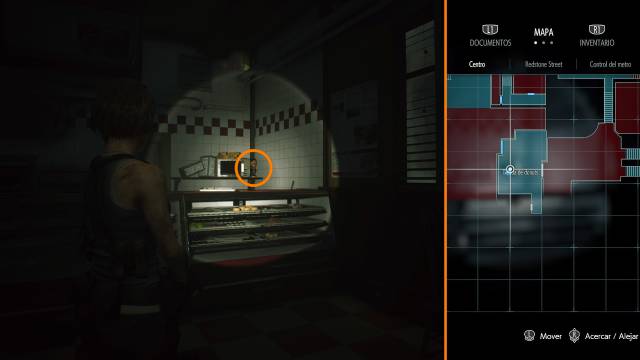
The doll is placed on the other side of the counter, next to a microwave. Here we must also make a quick visit to the kitchen to get the chain cutter, essential to get the next two dolls.
13. Alley
If we go out the back of the donut shop again, just ahead we have access to an alley blocked by an iron chain. After breaking it with the chain cutter, we will find another doll hidden near the briefcase and the couple of zombies feasting on one of the mercenaries.
14. Supermarket
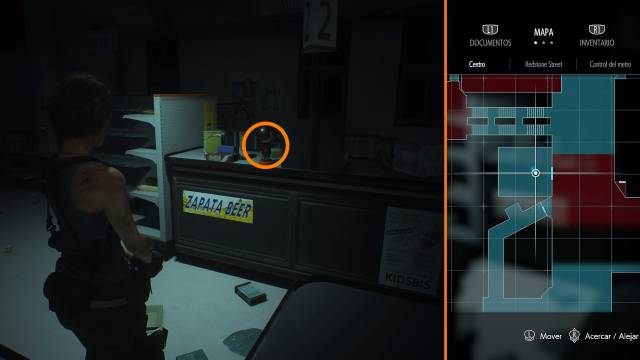
On our return to the first main street, where the toy store, with the chain cutter in our inventory, we will be able to access the supermarket opposite. His doll is not lost, it is on the counter.
15. Alley (Fire)

After using the hose in the fire hydrant to put out the fire, Nemesis cuts our advance and ends the demo. However, we have a small margin to walk before this sequence jumps, so we must carefully approach the corner and shoot the doll located on a ventilation duct.
Dolls linked to special conditions
Now comes the complicated. Well, not really that much, since most of the special conditions that trigger the appearance of the remaining dolls are easy to execute once we know how. But some will require a little extra expertise.
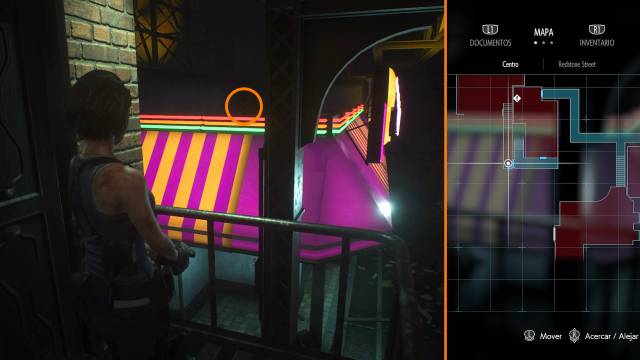
16. Streets (After observing the poster)
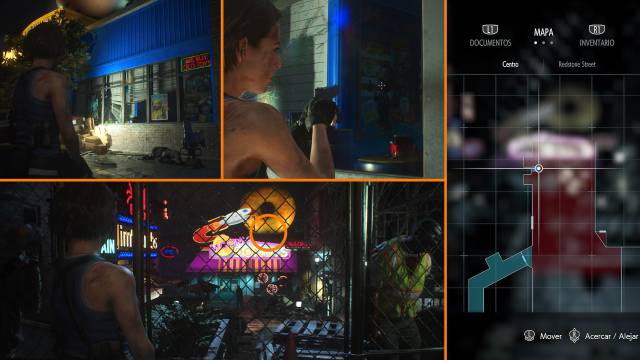
At the front of the donut shop we can also get a doll, but before it must be "summoned" from the toy store. To do this we must go to one of the windows with shutters half up, locate a poster with Mr. Charlie himself and point our gun at him for a while (ten or more seconds). To know if it turned out well, we just have to cross the street and see if the doll has appeared in front of the giant donut on the roof of Moon's Donuts.
17. Roof (After creating MAG bullets)
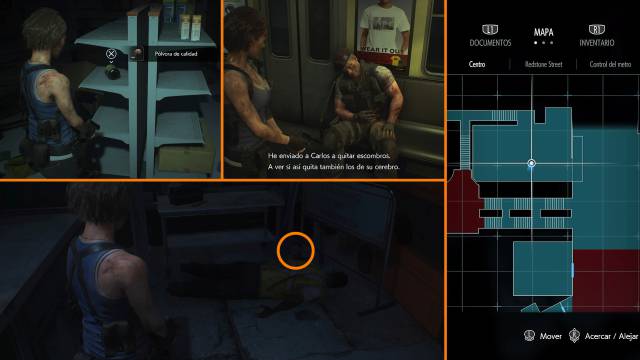
Although in the demo we can only wield a pistol and a shotgun – and an assault rifle if we switch to assisted mode after we die – it is also possible to create ammunition for Magnum if we combine two quality gunpowders (one is in the supermarket, another in the pharmacy). Although a priori useless, it activates a new dialogue with Mikhail back on the subway, and then the appearance of a new doll on the roof that leads to the metal stairs, this time next to a corpse on the ground.
18. Pharmacy (After killing the zombie out of range)
At the end of the demo, after using the hose to put out the fire in the alley, we must turn around and go back to the cars that block the road between the toy store and the supermarket. If we look closely, a new zombie will have appeared among them, inaccessible on foot, but that we can eliminate with one shot. Once dispatched, we have to go to the pharmacy. Our goal is waiting again next to the poster with the combination of the safe, on a table previously occupied by a corpse that has now come to life and can give us a scare if we get confused.
19. Police car (After making 25 evasions)
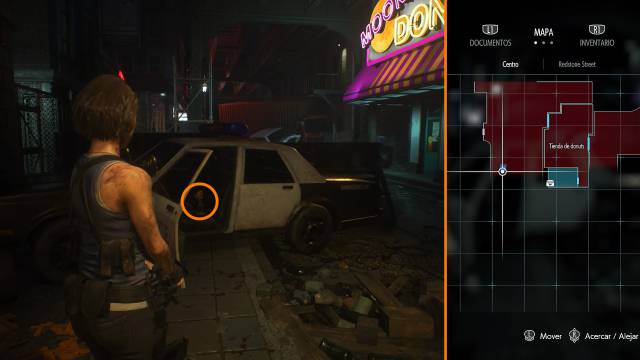
We get to the last two dolls and things get serious. Both are found inside closed cars, and the requirements to open them test our mastery of both defense and attack mechanics. The first challenge is to dodge enemy ramming at the last moment to execute 25 perfect evasions (distinguished by generating a blur effect on the screen) throughout the same game. Luckily, dying and loading a checkpoint doesn't reset the counter, so our advice is to practice against the first zombie to gradually internalize the correct timing.
After the 25 evasions are complete, we must head to the back of the donut shop and approach the police car at the southern end. A zombie will walk out the door and expose the doll.
20. Police car (After damaging Nemesis 3 times)
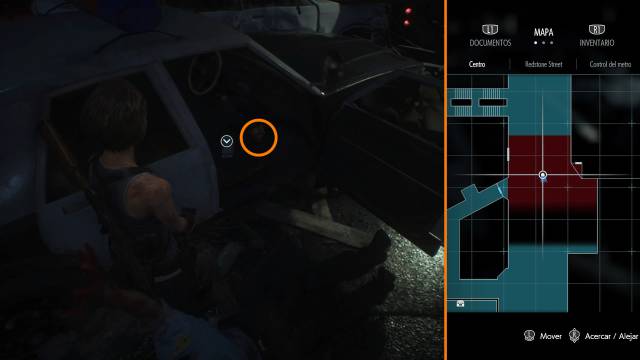
This task is easier than it sounds, but you have to have a couple of clear concepts before you start. The first, that the objective is not simply to knock out Nemesis, meaning by this the animation in which he kneels and takes a few moments to compose himself. What really counts as damage is a more specific animation, in which he raises his arms and then leans even further towards the ground and emits a different sound, product of his regeneration system. The second, that the hand grenades cause this state instantly, so if we find and use the two that are in the demo (one is in a locker in front of the shotgun, another in the corpse of the alley where we found the doll of the point 13), we will have already completed two thirds of the process without spending ammunition.
The ideal place to fight it is precisely where it appears for the first time, since we have a battery at hand to shoot to generate electric shocks and thus get small breaths during which to download shotguns or recharge. Once it begins to regenerate for the third time, we will have to go back to the car lock between the toy store and the supermarket (where we eliminated the zombie from point 18) and the police car will open to give way to the last doll.