We tell you the simple method to capture screen and record gameplay on Nintendo Switch and the options offered by this portable console.
A good gallery full of screenshots can help us relive the best moments of our favorite games without having to replay them. In addition, in titles like Animal Crossing: New Horizons, the captures are like photographs of the adventures lived with our friends and neighbors on our virtual island. If you are like us, we like to always have our finger on the capture button during cinematics, you can take full advantage of this guide to take screenshots as photos and videos (gameplay) on Nintendo Switch. In addition, we also explain how to extract them from the console and share them on social networks (Twitter or Facebook) through the platform itself.
How to take screenshots and gameplay on Nintendo Switch
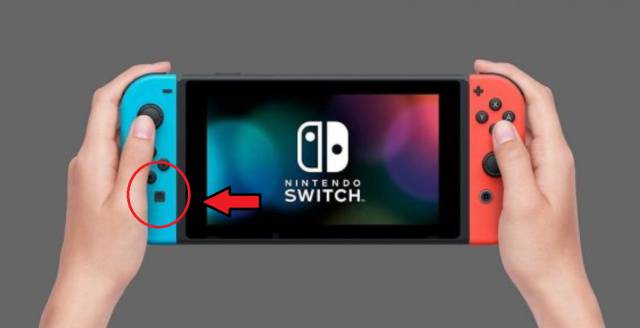
In the most recent console of the Japanese company we have a button dedicated exclusively to capturing snapshots. We can find it in the lower right part of the left joycon (it is shaped like a square with a circle in the middle, there is no loss). If we press it briefly, we will save the frame that the screen is showing at that moment (that is, a screenshot), while if we keep it pressed we will record a clip of the thirty seconds prior to the press.
How to post screenshots and videos on social networks from the console
Once we have the captures that we want in the gallery of the console, we can publish them directly on Twitter or Facebook. If we talk about still photographs, we can select a maximum of four per publication, while in the case of videos, we can cut them to our liking before sharing them on networks. If we want to transfer them to a PC or USB, we will have to extract the SD card from our Nintendo Switch and connect it to our computer using an adapter. Therefore, it will be necessary that we previously configure its storage in it, from the settings menu of the console.
Luckily it hasn’t rained like in Persona 5 ✌️ pic.twitter.com/k02rINsvN6
– deb (@npcdeb) August 2, 2020